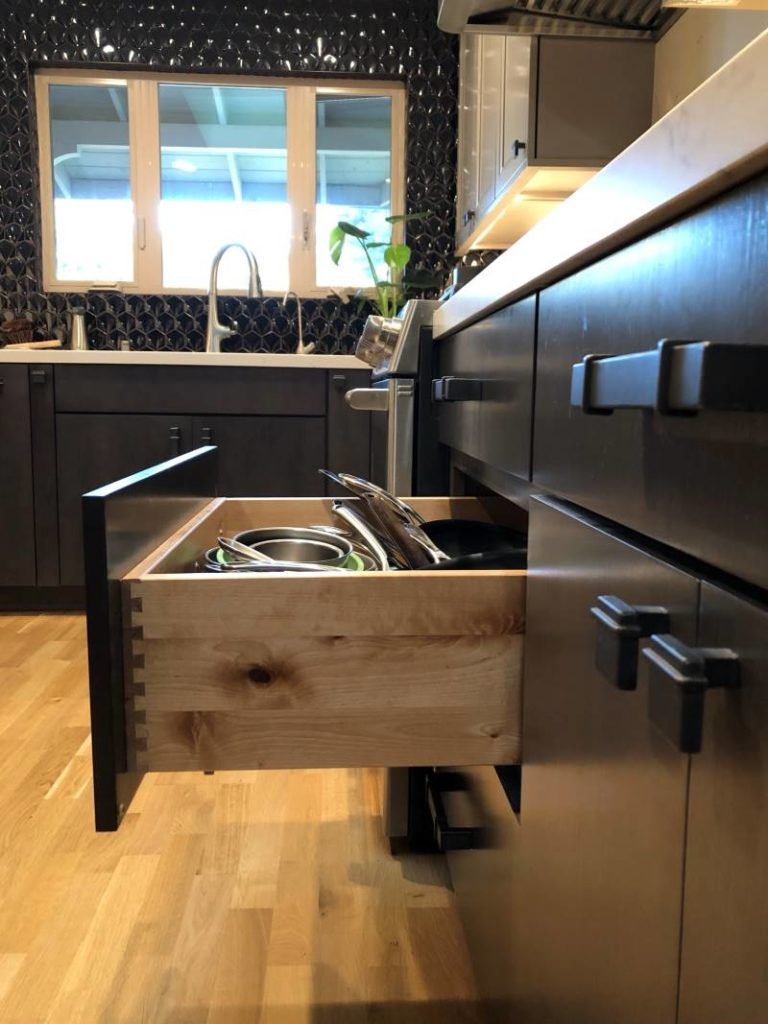
One of my recipe testers stopped by last week and I ended up showing her my new kitchen. Within seconds, we started talking about the cabinets. Cathy had a lot of questions and I started opening drawers and cabinets to show her what the cabinets held, their capacities and function.
She peppered me with questions about how I chose the cabinets and designed the layout. Cathy was not about to launch into a kitchen renovation but she was curious. She and her husband had built their own home so she has a deep understanding (more than I do) of what goes into putting together a comfortable living space. What does a cookbook writer need and want in a kitchen?
Our conversation made me think that you may have the same inquiring mind. We finished the kitchen renovation one year ago. After twelve months of using the new cabinets, I have perspectives to share. Whether you are dreaming of or seriously planning a kitchen redo, I hope my insights will help you.
Reface or Replace Kitchen Cabinets?
We wanted to renovate our kitchen to reconfigure things to be functionally bigger, more efficient and updated in look. There was nothing functionally wrong with the old cabinets except that they looked outdated. Made by American Woodmark, they were in pretty good shape, clean and and without scratches or dents. Given that, I initially thought that the kitchen cabinet be refaced.
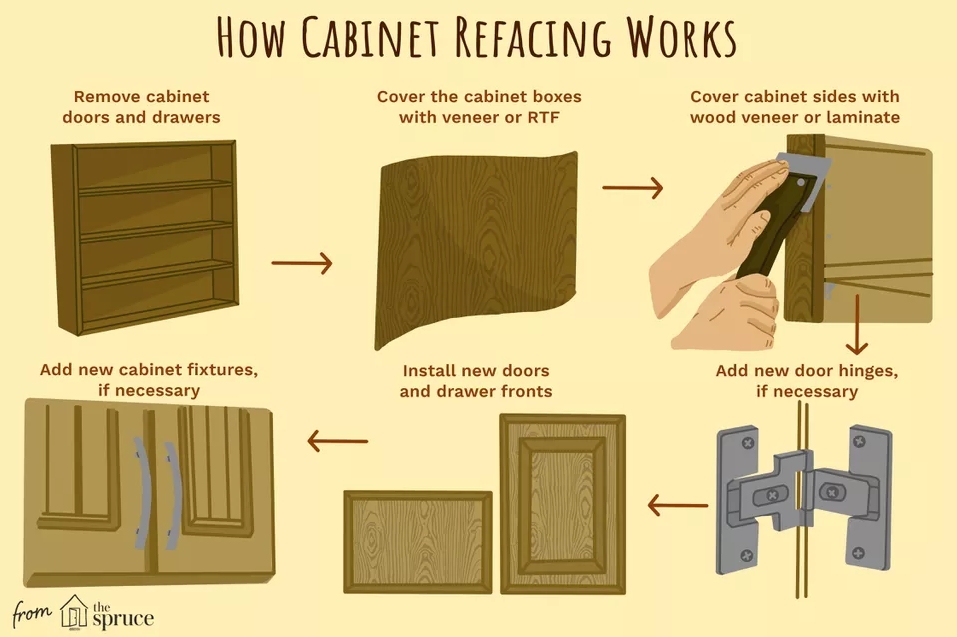
I had seen cabinet refacing as an option while walking through our local Home Depot. In a nutshell, cabinet refacing involves putting a new "skin" (strong adhesive finishes) on the skeleton of your existing cabinets and replacing the doors and drawer fronts so that thing would all match. Sometimes new hardware is installed too. It is done very quickly (within days, not months) and doesn't involve gutting the kitchen space. The graphic below from the Spruce details the process:
Because we wanted to add a pantry area (new cabinets) the estimate for refacing the old ones plus installing the new ones was $40,000. It seemed like a lot, so I went back to Home Depot and talked to a kitchen designer. Kim Coles informed me that refacing is not necessarily less expensive than replacing. Did I want to save time with replacing or did I want to start new?
I wanted my forever kitchen to work more effectively than the told one. That's to say, I wanted different designs of drawers and cabinets with more pull-outs. This is the kitchen that I would age in. Plus, we were planning on adding a pantry area. In the end, replacing the cabinets was our choice. It would be more involved and take longer but I'd get things the way I wanted.
When we bought our home years ago, we did a low-cost kitchen remodel that was fine for six cookbooks over the course of 17 years. But I'd been saving for a better kitchen and replacing the cabinets became part of the plan!
How Custom Do the Cabinets Need to Be?
As we geared up to make decisions for the new kitchen, what became important were these factors: colors that suited our style, long lasting craftsmanship (such as good glides, sturdy drawers, and durable finishes), and a wide variety of cabinets that suited my particular storage and usage.
My sister and a gal who worked at our dentists' office said that they went with a local cabinet maker to get a beautiful wood grain finish on their cabinets. I didn't want any particular wood grain finish. Our old cabinets were finished with a golden brown hickory veneer and we wanted a change.
Still, should I have the cabinets built for me by local maker? One general contractor who built custom cabinets as well as installed them told me that nowadays, he can't easily match the quality finishes and price of many of the big cabinet makers. Given that my kitchen is my workspace and I had a moderate budget, he advised us to buy cabinets from a reputable major manufacturer. Kirk offered to install them and he did a masterful job that impressed our eventual general contractor. Here's a video of Kirk's installation:
Cabinet Colors, Construction, and Function
To arrive at the color scheme for our kitchen, I hung out on Houzz late into the wee hours of the night and created a Pinterest board. Professionally, I got to spend time in other people's kitchens where I often opened doors and drawers; my friends didn't mind because we were often cooking together. Airbnb rentals also offered opportunities to test drive cabinets. Over the years, I test drove fancy custom built cabinets as well as prefab ones. I also visited kitchen design showrooms and asked questions.
Our kitchen designer at Home Depot, whom I've written about earlier, showed us a range of cabinets. I went with Kraftmaid, which has an excellent reputation. Its door options and finishes were more transitional than traditional and modern. I love modern and rustic styles but our home was built in the 1970s and our style mixes old and new, East and West. That's to say, I'm "transitional" when it comes to style. Details like dovetailed drawers sold me because I like to see wood grain and craftsmanship. I also opened and slammed closed the doors many times at the store to test the soft closures!
To choose the colors, I ordered sample doors (the cost was refunded after we bought the cabinets). We hung out with them in our home to make sure the light would be right. In the end we went with Kraftmaid's Burmese finish on the top and Cannon Grey for the bottom.
The beauty of companies like Kraftmaid is they have a catalog of components that you can browse to put together your design and layout. It's like putting together a clothing ensemble!
Specialty Kitchen Cabinets
I'm not into open shelving or clear glass doors in my kitchen because I don't want people to see my messes. Open shelving requires more cleaning (think of that gummy good that accumulates!). I wanted to use all the kitchen space but still have an airy feel. That's why a few doors have glass to bring in a feeling of light.
How did I use my kitchen? What did I want versus what did I need? I knew I needed these things:
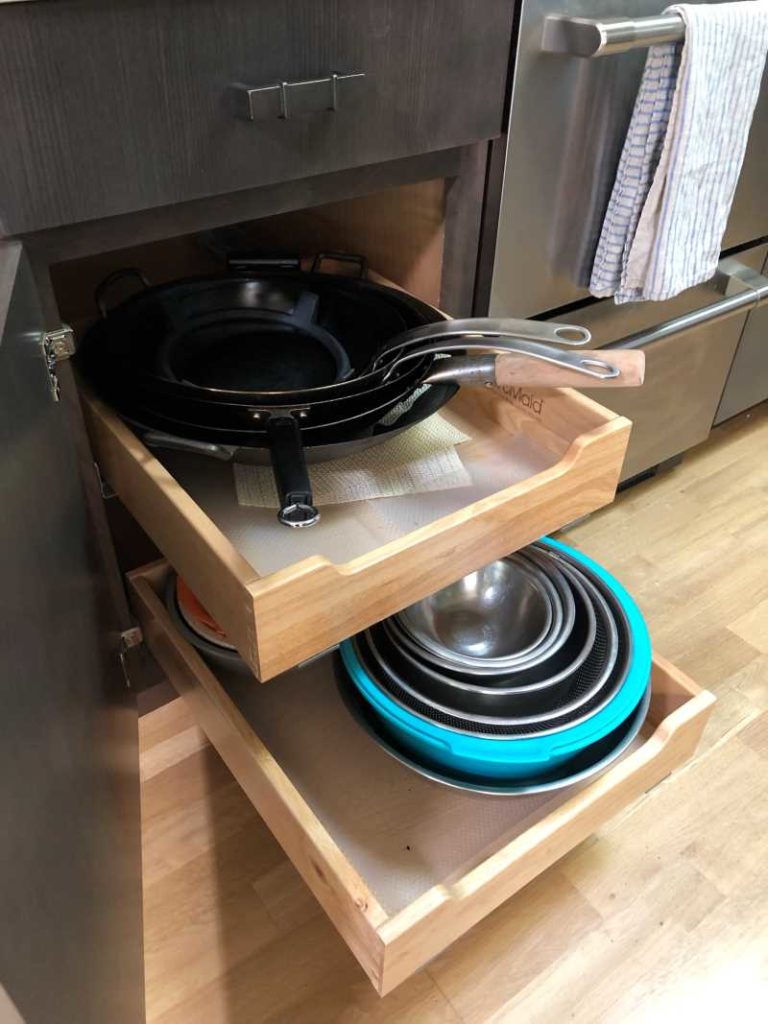
Wok pull-out storage shelf: I measured my biggest wok (18 inches!) and used it to determine the width for a cabinet with pull out shelves. Below, I have 4 woks plus a carbon steel skillet and the wok ring on the top shelf. The bottom one is for big mixing bowls and colanders.
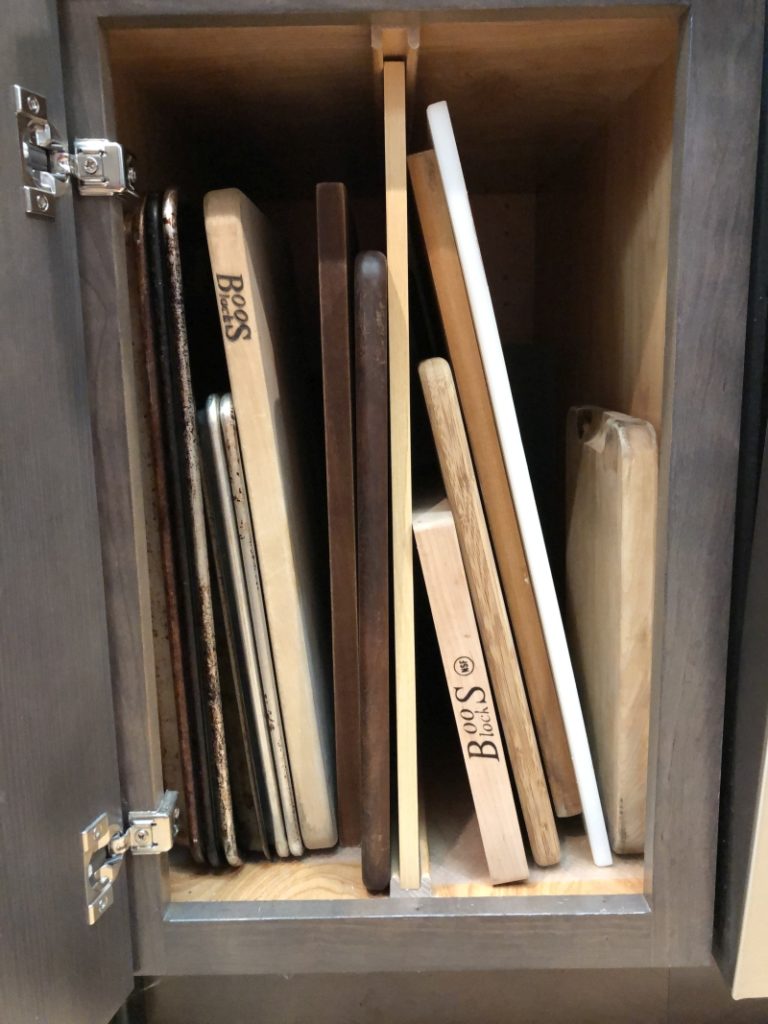
Cabinet for cutting boards and baking sheets: The boards used to sit on the counter and occupied huge amount of real estate. I wanted them hidden below deck. The depth of the cabinets means I can double store some of the smaller ones. I use the stove's warming drawer to store some baking pans but the balance of half and quarter sheet pans sit in this cabinet!
Condiment bin: For easy access to my most-used condiments, I repurposed a narrow trash can cabinet. This is where fish sauce with preservatives reside; preservative free ones are in the fridges. Soy sauce, rice wine and a few vinegars are in there too. The cabinet gets warmish being next to the stove but I use these condiments often so I'm not concerned about them suffering. Also, my oven's heat vents well.
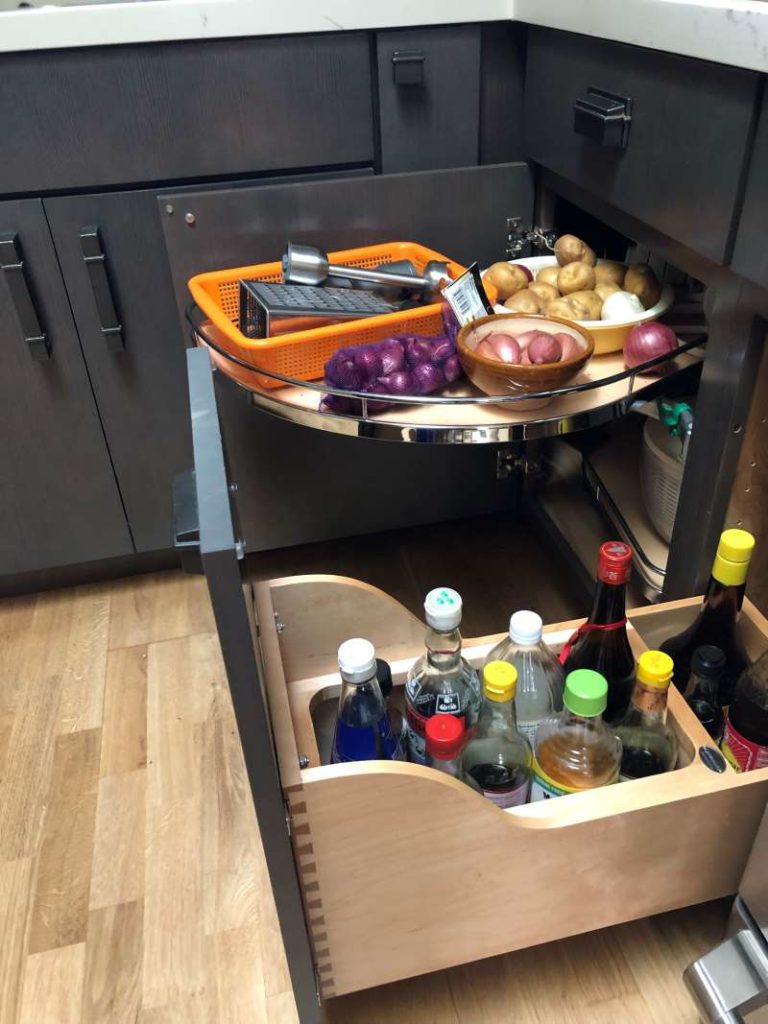
Swing-out blind corner cabinet: For 17 years, I put things into that far corner cabinet only to practically crawl into it to retrieve things. With the new cabinets, I made sure there was space for the swing-out cabinet, which we named "Beanie" because it's shaped like a bean. The cabinet doesn't store as much as it did before but I easily access what's there with complete ease. It makes me very happy.
Positive Surprises
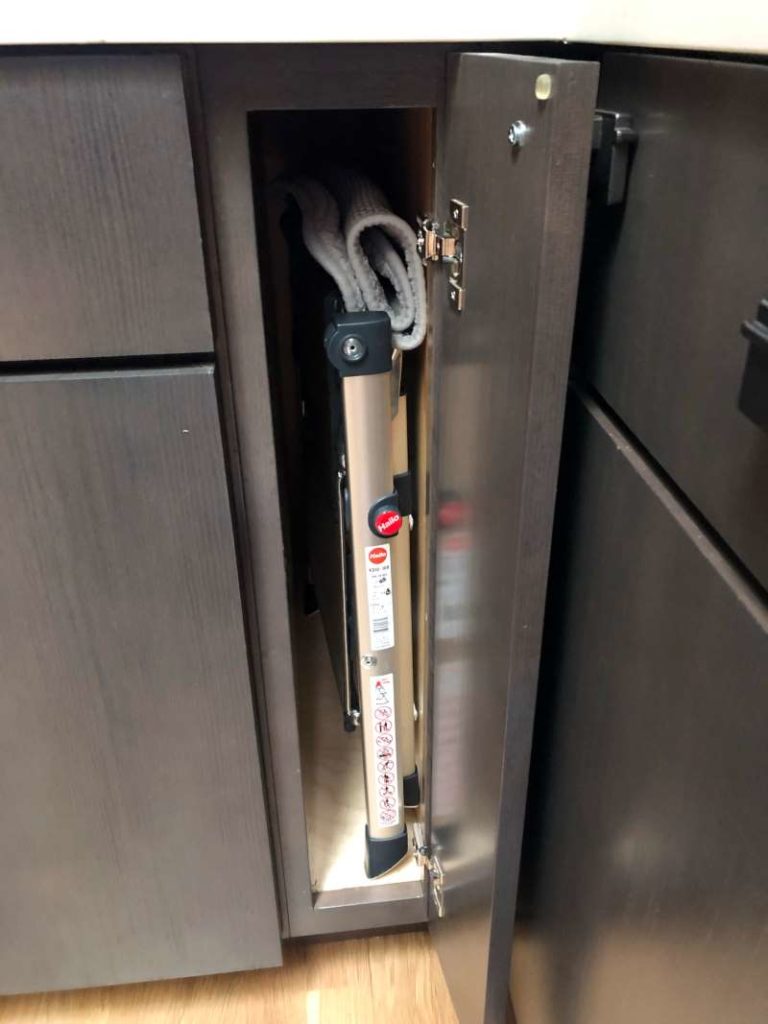
I'm of average height and so is my husband. There was no way we could get to the high cabinets without a step stool. Given that, I included a step stool cabinet in the design. I also scoped out a slender step stool to fit inside, but when the cabinets were delivered, the stool was included. Because the stool sits by the kitchen sink, we store a dish drying mat, wrong side out, in the cabinet too.
In our old kitchen, a one-time leaky pipe led to the cabinet base warping. The new kitchen sink cabinet has a super thick sturdy plastic bottom. No more worries.
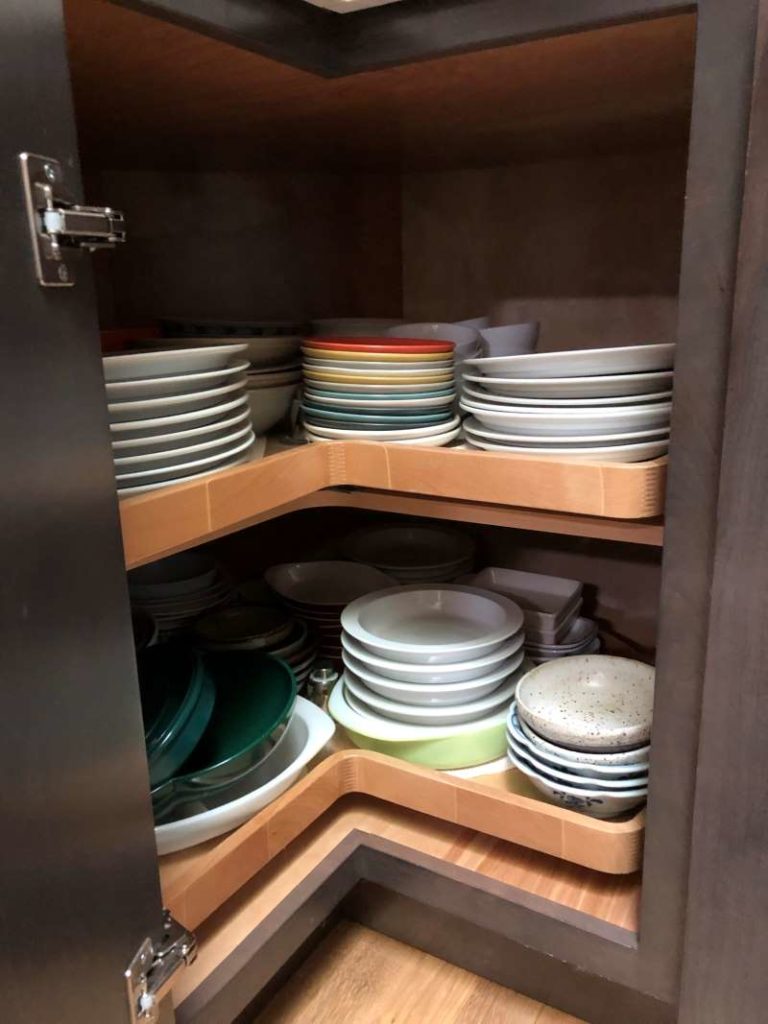
Also, our old cabinets had a corner lazy Suzan that occasionally fell apart. In the waning days, it wobbled from being constructed with a single metal pole support. In the new cabinets, the upper lazy Suzan is supported by a solid wood platform. There is no center pole so you can easily get at your dishes! What a difference 17 years between remodeling projects make!
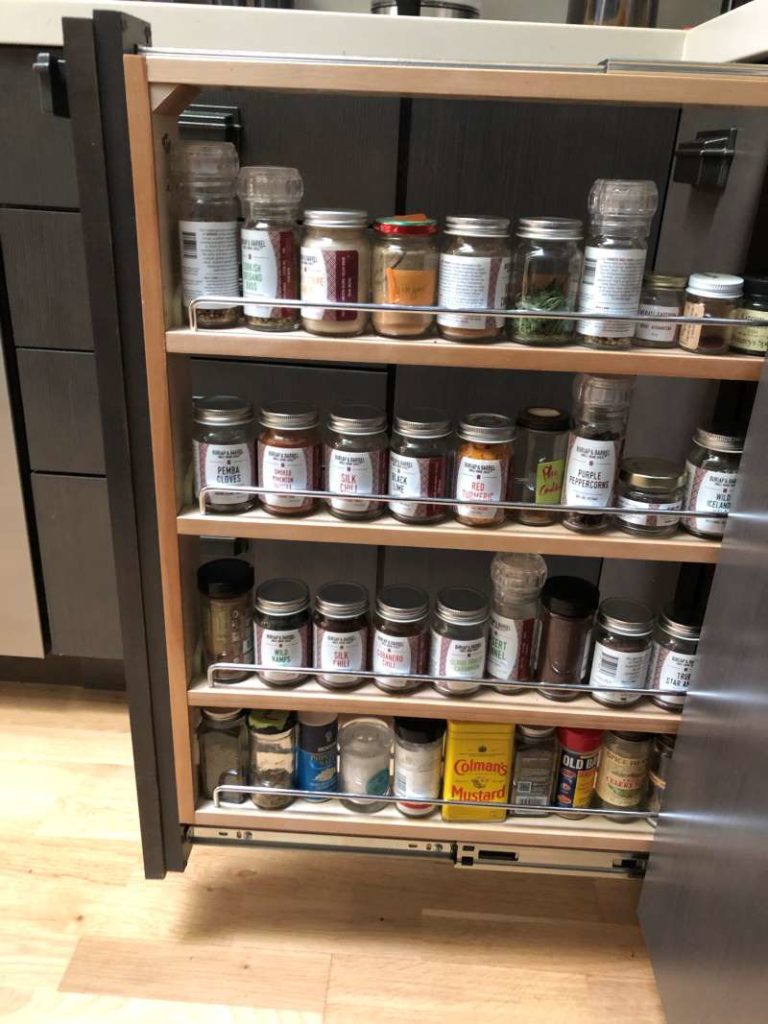
I didn't need newfangled cabinets like the ones that fit in the toekick for you to store stuff under the base cabinets. BUT, with unused 3 inches left in the base cabinets, I opted for a spice cabinet. The guard rails are low so I have to be careful to avoid knocking bottles out. However, I can now see where things are. (Spices also occupy a wide drawer near the stove.)
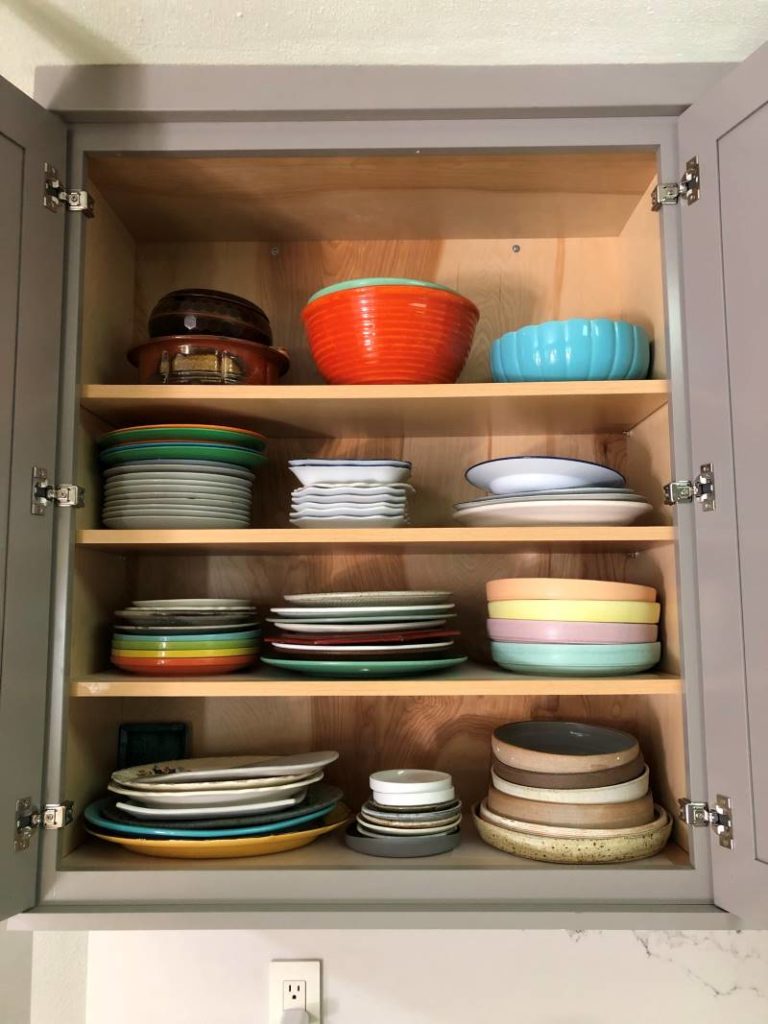
Another happy surprise is with the wood veneer backs of the upper cabinets. I have a lot of dishware and finally, can see much of what I collect and more of them get used. The handsome wood grain in the uppers makes everything pop. When I open the cabinets, the dishes look like they're at a fancy store.
Surprising Letdowns
Given all the details and care that go into Kraftmaid's design and construction, I was disappointed by a few things. They are nitpicky. The pre-drilled holes for the all the cabinet shelving are spaced in such a way that you cannot have a shelf in the middle position where the hinge is locate unless you have about ⅛ to ¼ inch of the shelf cut off.
I didn't realize that until I started organizing and putting things into the new cabinets. I had to strategically arrange things or pay the installer to cut off the back of some of the shelves. Flummoxed, I complained to the Kraftmaid sales rep who confirmed that yes, that is a problem. I told him that consumers pay a lot and should not have to shoulder that extra cost, especially if it can be avoided on their end.
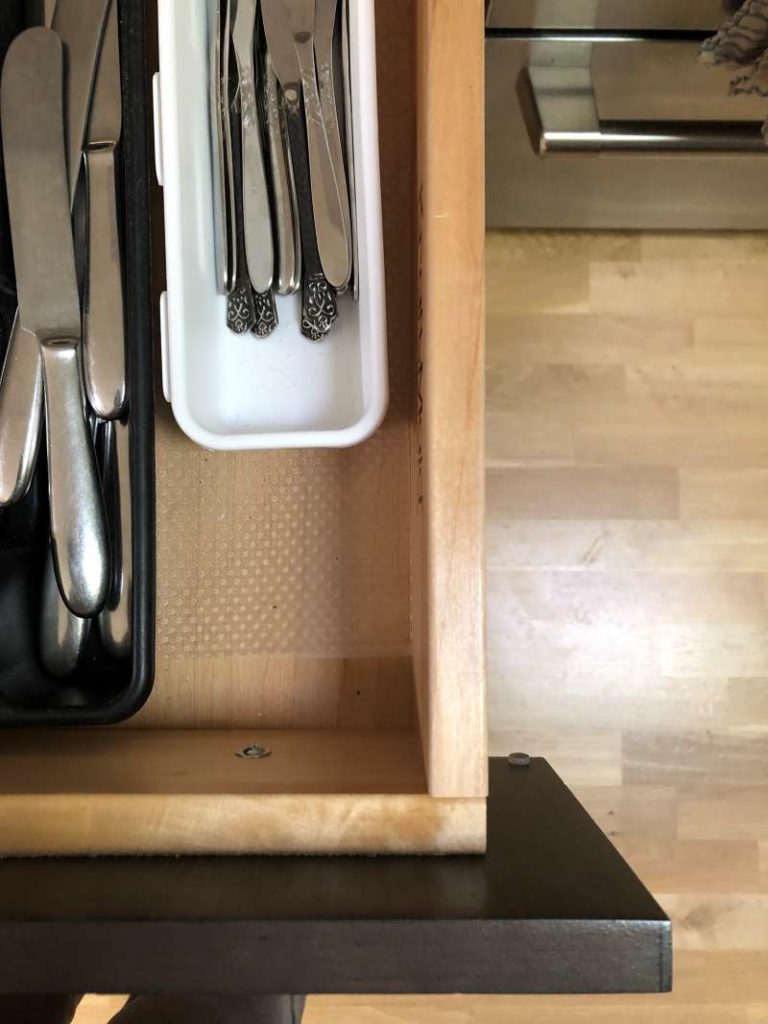
Additionally, my base cabinet drawers are narrow-ish because of their design. I knew that the width of the drawer didn't span the width of the drawer's face. It's not a major issue because I have lot of drawers but was tight with some of the narrow ones. You lose inches of storage space, as seen in the photo below.
If that's a concern, check the width and your preferences before settling on a cabinet maker. Some makers, like Ikea, have base cabinets that maximize the width available.
Unless a Kraftmaid cabinet is considered "decorative" with fancy glass door, the underside of the cabinet is not painted to match the chosen exterior color. I had a mix of decorative and regular upper cabinets. As a workaround, I color matched the Burmese color and spent an afternoon painting the underside. The cabinets were already installed so it was time in an awkward backbench. I stretched before and after.
Ask, Budget, and Evaluate Before Buying
I marinated and simmered on what and how I wanted this kitchen to be like. Kitchen renovations are big investments. Depending on where you shop, there may be sales now and then, so don't be afraid to ask or tell your designer that you're on a budget.
I talked to a lot of people and pull then slammed a lot of drawer and cabinet doors. My parents have marveled at the new kitchen via Facetime, and we've talked about how modest our family kitchen was when I was young. My mom pumped out a lot of good food back then, so you don't need a fancy kitchen to cook well. That said, it's nice to get what you want.
I love the beauty and functionality of my new kitchen and the cabinets have a lot to do with it. I've been lucky to do two kitchen remodels to this house. The first one lasted us 17 years. I planned this recent one to last forever.
Do you have tips or experiences to share? Don't hold back!



Jacqueline Church says
Stool storage
Condiment bin
Both HUGE wins.
The corner lazy susan single pole issue - I feel this pain. Replaced ours myself about a year ago. Not hard but not eager to repeat on the regular.
We are also in our forever place so I'm learning patience and this first big project is already challenging and I'm only in the winnowing and discarding stage. (Closets) Deep breaths.
I really appreciate your sharing these posts and insights. Your kitchen is beautiful and these details are amazing. I'm bookmarking this on Pinterest to return to when we get around to the kitchen.
elena says
How did it compare to the refacing cost in the end? This is all gorgeous, I hope it serves you well for many (many, many) years to come.
Andrea Nguyen says
Well, it's somewhat hard to say because we got a custom hutch and pantry area included in the cabinetry cost -- that wasn't in the original estimate for refacing. However, there was cost associated with demo and prep plus installation. I venture that in the end, we spent the same amount but I got exactly what I wanted plus more. Part of the thing with refacing that I didn't like was we were stuck with certain styles and finishes. I felt that $40K didn't fully reflect all the costs too. So, by spending more time to source things ourselves and more headaches, we got more bang for our buck.
For example, the countertop is a Ceasarstone surface that I've longed for and it wasn't available as an option with the refacing. We used nearly every inch of the three slabs and worked with a phenomenal company for the fabrication and installation.
That said, if I had a family and busy home life, refacing would look quite attractive. The saving in time is remarkable.
Molly B. says
We redid our kitchen when we bought our house 6 years ago, and I wish that we'd had a little more time to plan and weren't watching our budget quite so closely (though we still went considerably over budget). We were so burned out by the time it was done that we let some things slide with the contractors that we should have had them fix.
Good decisions:
-Deep sinks
-Deep pull-out drawers that can handle heavy pots (We love these! I wish we'd done more drawers and fewer traditional cabinets.)
-Soft-close drawers and cabinets
-Raising upper cabinets higher that the standard height above counters. I love having the extra 3 inches to fit things under the cabinets, but this does raise the cabinets so might not work as well if you're on the shorter side.
Bad decisions:
-Pretty but cheaper cabinets. They really show dings and the facade is peeling on the baseboards where they've gotten damp (especially around the dishwasher). I wish we'd been able to spend more on solid wood that wouldn't peel and show dings as easily. We also lost a fair amount of space because we were working with set drawer and cabinet widths that weren't a good fit in some parts of the kitchen. We lost 3-4 inches on some cabinets.
-We didn't scrutinize our (composite quartz) countertops closely enough after they were installed. There were a few spots where they messed things up cutting them and then sanded it down in hopes that we wouldn't notice, and we didn't until we'd already signed off. They annoy me every day!
Andrea Nguyen says
Molly -- Kitchen redos are strangely exciting and traumatizing. I appreciate your 20/20 perspective on what went right and not-so-well.
Yay to deep drawers for those heavy pots and pans! This was the first time I had them and love them every time I pull them open.
The cool thing is that space between the lower and upper cabinets. For a long time, I thought there was a standard. You were far ahead of me!
Your experience and insights will help other folks. Thank you!
Dave Mackmiller says
Nice design. I think your kitchen is about the same size as mine, just under 100 square feet. I was also quoted around $40k for a high-ish end remodel. Instead, I decided to do it myself as a challenge for my retirement after 40 years as a software engineer. Problem solving instincts really helped with this project.
The problem with my 100 year old condo is that the walls were not plumb, the ceiling was 4 inches higher on one end than the other (as well as the floor), the walls were not very straight, and they weren’t even exactly parallel to each other.
Long story short, without having much experience with this kind of thing, I figured it all out with the help of the internet.
Anyway, I settled on IKEA cabinets for several reasons: they come with a 25 year warranty (!), they’re inexpensive but not cheaply built, and they are easy to work with. For example, an upper cabinet 2 feet wide and 2 1/2 feet high starts at about $80. That includes door, hinges and shelves. I spent a total of $2500 for all of my cabinets and hardware. After figuring out how to build the first one, I could build and install the rest in less than a half hour each. Of course, that was after leveling everything first.
I also got my countertops from IKEA, for about $3k.
The main feature that I’m most proud of is that I had a small deep freeze in the kitchen before the remodel. These are great for saving money if you shop at Costco and want to freeze stuff you won’t use right away, For the remodel, I built a shelf for the deep freeze on shelf rails that would slide it out completely from underneath the counter. They are rated for 220 pounds, we’ll below the weight of a fully stocked freezer. This added countertop space above it that I didn’t have before. Really opened up the kitchen.
I could go on, but the other thing that was essential was a range hood that vented to the outside. I do a lot of high heat wok cooking (which is why I’m a fan of this site), and I was tired of the smoke alarms going off. $500 for a range hood and $1500 for a contractor to vent it out of the kitchen. Pricey, but I can’t live without it now. I can even roast coffee without stinking up the joint!
Oh, one more thing. I designed it so that there was a one foot overhang at the end of one of the countertops where I could put a small chair that also doubles as a stepstool to reach the high cabinets. Now my wife can join me with her cocktail while I cook. She often reads to me from Jane Austin or her favorite French authors - which is much better for the soul than listening to the news!
Andrea Nguyen says
Dave -- this is all so wonderful! Thank you for sharing your experience.
You're incredibly brave to do this DIY. WOWZA. There are many ways to do a kitchen renovation and I'm totally in awe of your endeavors. Moreover, you have incredible money saving tips.
Fantastic idea on the deep freeze in the kitchen. That's so smart. Mine is in the garage so we get a little extra exercise.
I also like your extra overhang to serve as a small area for hanging out. I'm with you on the range hood and ventilation. It's incredibly important in a kitchen.
And now, you and your wife have this space that's tailored for your lifestyle. That's truly living well. Cheers!
Maria says
Great Blog. Pretty pics on Pinterest are one thing, but how you actually build the kitchen is the harsh reality! I ended up going the same way Dave did - after getting a number of scarily expensive quotes, we decided to buy an Ikea kitchen, but bought high end appliances and a countertop, backsplash (and matching window sills with the offcuts) from specialists. Would do that again absolutely. With Ikea it's also very easy to reface, as all you need to do is screw new fronts onto the hinges.
However, that was ten years ago, and now there's more options, such as your lovely pullout cabinets (back then drawers instead of cabinets was radical!). I love your stool storage space, but if your kitchen doesn't permit that, a pretty wooden stool serves dual purpose for getting to those high spots and letting someone sit in the kitchen and chat. Having a smallish European kitchen, we really have to improvise, and as such, I hang my woks on the door of my under-stairs pantry.
This is a lovely kitchen Andrea, and yes, it's a luxury, but if working in such a space makes us even happier doing what we love (cooking), then why not?!
Thanks again to one of my favourite authors for sharing this informative post.
Andrea Nguyen says
So true! Pinterest boards inspire. No one discusses the cost and trauma of putting a kitchen together!
I love how you blended in Ikea cabinets with quality appliances and countertop and backsplash. And yes to Ikea's ability to 'refresh' your cabinetry with new doors.
Your under-stairs pantry sounds charming. I have an extra pantry that's essentially a hall closet.
A comfortable kitchen does lead to happiness, Maria. Thank you for sharing your insights!
Yoli says
Fantastic post.
I am in the middle of designing my kitchen and your posts are always so helpful with a lot good insights.
Where is your trash and recycling? Are they close to the sink or in a different area- I see design with the trash can close to the prep area and not the sink.
The stool storage- brilliant!
I just need to learn how make a mood board on Pinterest 🙂
Andrea Nguyen says
Thanks, Yoli.
Trash. I make a lot of trash and keep a large trash can at the end of the counter. It's not hidden from view in a cabinet. I usually keep a large green cycle container (a big crock with a bio bag liner) on the counter. Also, I'll put non-greencycle refuse in a small recycled produce bag and put that into the big trash can. So, there are 3 trash options in the kitchen.
The kitchen cabinet trash set-ups never worked for me when I tried them out at other people's homes. They're seldom big enough and I don't like opening a cabinet to access it because then I have wipe the knob afterwards.
If this helps, the trash can I have has a motion sensor lid.
Amanda Smith says
Great article, thanks for sharing. Keep up the good work, the article is very informative. Check - https://cabinetrefacingrichmondva.com/
Irene says
Kitchen remodeling is so exciting and scary at the same time! And many sleepless nights dreaming and pouring over pictures and design ideas!
We're about to embark on a kitchen remodel ourselves and will probably micmic Dave and Maria's process. Will DIY with IKEA cabinets, but get Caesarstone and better appliances installed. Unfortunately we're not having much luck finding installers and general contractors within our budget. The joy of living in the Bay Area!
Andrea Nguyen says
Hi Irene! The joy! The fear! It will be worth it at the end.
For countertop installation, it depends on the Ceasarstone you choose. I went with CS Statuario Nuvo honed and worked with United Marble and Granite, based in San Jose. They were super helpful in answering my questions. I had a lot of questions because this is a major investment. https://www.unitedmarbleusa.com/